Spring is finally here! The earth is thawing, the daffodils are sprouting, and (if we are very lucky) the sun is shining. And RVers across the continent are starting to get restless. The phantom hum of tires on pavement, the muscle memory of backing their trailer into a tight campsite, and the smell of roasting (okay, burning) marshmallows over a campfire call to them. It’s time to pull their RVs and themselves out of their winter dens. It’s time to hit the road. It’s camping season!
But first, as every RV owner knows, there is work to do.
Whether you are a year-round nomad, a weekend warrior, or anything in between, the longer days of Spring mean more daylight for working on your rigs. If you spend the winter months traveling in colder climates or you’ve kept your RV in storage, one of the first things you will need to do is “De-winterize” your water systems.
Get your AquaGo Ready for Spring
Step 1: Inspect your AquaGo filter cartridge to ensure it is still in good working order. Make sure the O-rings are in good shape and properly seated in the grooves on the cartridge.
If your filter cartridge or O-rings are showing signs of wear, replacements can be found at amazon.com/truma
Step 2: If decalcifying your Truma AquaGo was not part of your end-of-season checklist, now is a great time to take care of this annual maintenance.
Step 3: Using your RV Manufacturer’s plumbing instructions, locate your bypass valves and return them to their normal operating positions.
Step 4: Add water to your freshwater tank
Step 5: Open all taps (faucets, shower heads) to run water and purge any air from the plumbing before turning on your Truma AquaGo.
Step 6: Turn on AquaGo and confirm that the amber-colored LED at LED 2 on your wall control is illuminated.
Now you are ready to hit the road with instant, constant, endless hot water!
Get your Combi Ready for Spring
Step 1: Using your RV manufacturer’s plumbing instructions, locate your by pass valves and return them to their normal operating positions.
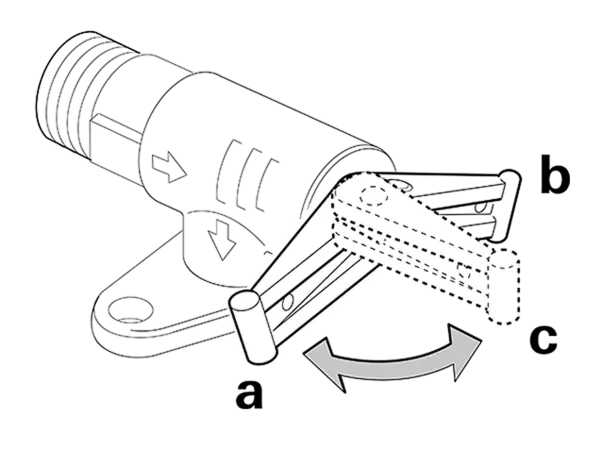
Step 2: Close the pressure relief drain by flipping the yellow handle down.
Flip yellow handle “down” to be at a right angle to the drain.
a, b = lever in “valve closed during furnace operation” position c = lever in “draining” position d = drainage socket
Step 3: Add water to your freshwater tank
Step 4: Open all taps (faucets, shower heads) to run water and purge any air from the plumbing before turning on your Truma Combi.